
I am sure many of your networking savvy, bloggers and photographers out there may have realized the dilemma right now of not getting credit for your artwork or photography that we share online. You may run into your photo on some random Facebook page without even mentioning who those the image belongs to. many do not get credit for their gorgeous work and that is A SHAME! We all work hard to create and inspire but some may see your work and not even know its yours.
Watermarking images is VERY important. I know that many may have the expensive software to do that. Photoshop or Microsoft publisher {I have a much older version of Microsoft Publisher and I could add watermarks to my images with it)
But there is also free online website that let you add watermarks to your images called PicMonkey.com.
Basically all you are doing is adding text to your image. Its either your name, company name, web-address or blog, where ever it is you want to direct your online traffic to, when anyone sees your photo/image.

I am going to use this post to show you how you can use pic monkey to add text to your image. Its a free, online, photo editing service and everyone has access to it. You do not even have to sign in or create an account to use their services.
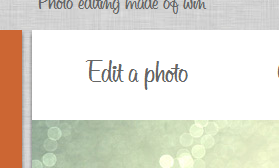
 So when you click here at picmonkey.com you will be directed to this page as you can see above. If you wish to try working on a photo watermark while at the same time you follow these instructions I suggest you open a fresh window then go to picmonkey.com


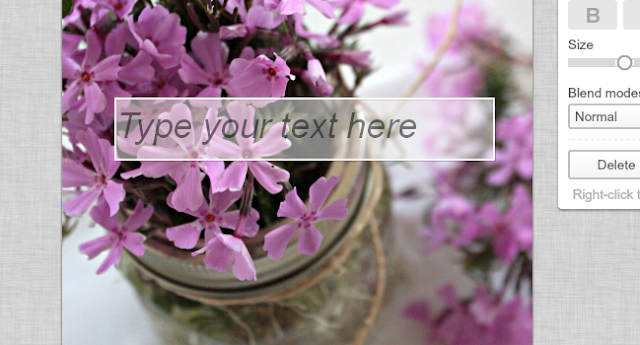
 As you can see here I typed my blog name "Creating Vintage Charm". You can highlight your text then edit color, size, bold, italic and so on.
 Step 6. Text is placed on images and is visible (Of course) but you can also have visible text while still viewing your image through your text. I did that by setting the blend mode to Overlay, clicking the down arrow on blend mode options and scroll down the options till you find overlay mode.
 Step 7. One the far right you have your selection of fonts. Please note that the ones marked with the orange crown are fonts not available for non-members of Pic Monkey. Everything else is available and I think they still have a pretty good selection of fonts to choose from.
Tip: I suggest picking a font that is easy to read. Some could look very complicated especially if you are watermarking your photo using a web-address that could sometimes look like a long confusing word. So its important to use less fancy and more "read-able" font.
 You can scroll up and down to view all their fonts. You can also move your text frame to different area on your photo. Just click on your text frame then move it around on your image, with your mouse.
Tip: If you wish to add another piece of text such as Blog post title {For pinning purposes} then just repeat Steps 4-7.
 Step 8. After we are done writing text, it is now time to save your image, so just click on save.
 If you wish to change your photo name for filing purposes, you do that in this step. Where it says "File name" change the jumbled numbers to anything you want. I suggest you leave the Quality setting to Pierce for easy sharing. Then save your image to your files in your computer.

Watermarking images is VERY important. I know that many may have the expensive software to do that. Photoshop or Microsoft publisher {I have a much older version of Microsoft Publisher and I could add watermarks to my images with it)
But there is also free online website that let you add watermarks to your images called PicMonkey.com.
Basically all you are doing is adding text to your image. Its either your name, company name, web-address or blog, where ever it is you want to direct your online traffic to, when anyone sees your photo/image.

I am going to use this post to show you how you can use pic monkey to add text to your image. Its a free, online, photo editing service and everyone has access to it. You do not even have to sign in or create an account to use their services.


Step 1. Click on "Edit a photo" and your browser window open where you can locate your photo in your files. After you locate the photo or image in your computer files that you wish to watermark you can double-click on it.

Step 2. After you double -click your chosen image, a window opens that asks which image setting you wish to choose. The "Jack" would re-size your image to a much smaller file, "Bubbles" is their recommended setting and its the one I chose for this How-to. Its a decent size image, that works best for networking and can print well for up to 8x10 enlargements. "King Kong" would be a massive and not really necessary if you want to upload image to networking sites. It may not even be accepted if its a big file.
So when this window opens all you have to do is hit "Save"

And a fresh page opens with your chosen image

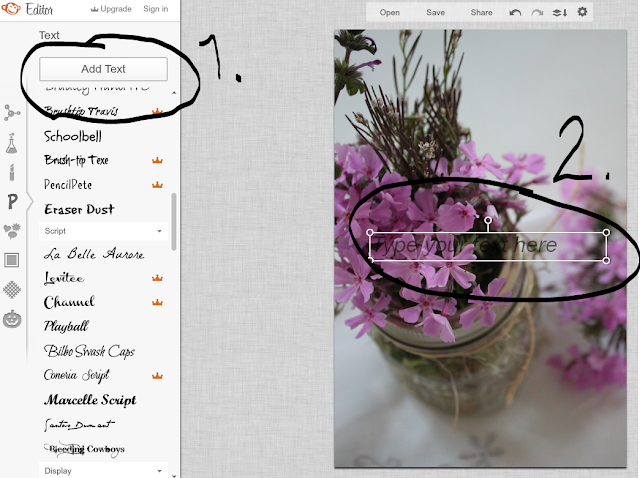
Step 3. After opening image we are going to add the text by going to the Text settings. Clicking on the "P" takes you to the text settings .

Step 4. You click on "Add Text" {#1} then a frame on your image opens up {as you can see where marked #2)

Step 5. Placing your cursor (arrow) inside the frame, double click and type any text you wish to type.


Tip: I suggest picking a font that is easy to read. Some could look very complicated especially if you are watermarking your photo using a web-address that could sometimes look like a long confusing word. So its important to use less fancy and more "read-able" font.

Tip: If you wish to add another piece of text such as Blog post title {For pinning purposes} then just repeat Steps 4-7.

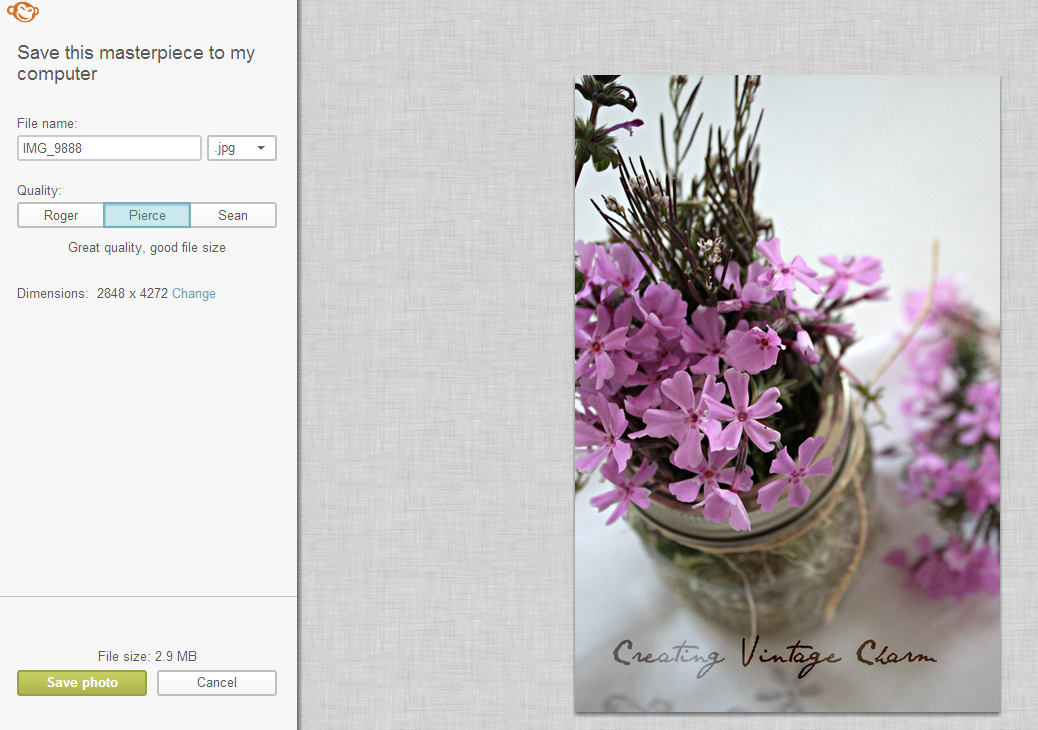

And here is my watermarked image after I saved it. Its photo shot of a handful of phlox my kids brought in from my yard. A sign of Spring out in the garden. I love these tiny flowers and and its any mom's heart melting moment I'm sure to see a little one walking inside with a handful of these.
I should also add that:
1. I think it is important to save your original image without the watermark. If you are ever approached by a magazine editor to contribute your images... {*wink*} They may not want to watermark on your photo to publish on their magazine. You should be getting credit for your image anyway though the feature.
2. By doing this how-to, it doesn't mean it is OK to copy other's images to publish on any other networking sites or any other types of media, without the owner's rightful permission. I simply did this so artists and photographers protect themselves and if their work IS being shared, they are at least getting something back from it.
I hope that you will find this how-to, useful and easy to follow.
Enjoy this Spring season.
Con amore,
Sonia
5 comments:
This was amazing Sonia. I have always used picasa, but I see fonts in this site that I know I would like better. Thank you for your time in teaching us this.
Hi Sonia,
Thanks for sharing this tutorial! I found it useful to use with the images of my own artwork.
Cheers
Your cuz
Audrey
You are awesome! Thank you for sharing this website!!!
Thanks Sonia! I watermark in Picasa, but wii check this out. What do you think about putting it in the middle of the photo to keep people from cropping off the watermark? I know it would take away from the photo for sure.
Blessings~
Nice shhare
Post a Comment